
1 / 4 · Click to enlarge
DIY Sine Triangle Square Wave NE555 Multi-Channel Waveform Generator Module Kit
5.02 ratingsThe DIY Sine Triangle Square Wave NE555 Multi-Channel Waveform Generator Module Kit is a value-for-money product designed for DIY enthusiasts and makers. Customers praise its excellent build quality and great value for money.
Available Offers
Free Delivery on this order. No minimum order value.
15-Day Easy Returns — hassle-free return & full refund.
Secure Payment — 100% safe checkout with UPI, Cards & Net Banking.
Available Offers
5% Cashback
Pay with UPI & get 5% cashback (up to ₹50) via Razorpay
No-Cost EMI
Available on select bank cards at checkout. 0% interest for 3 months.
Free Shipping
Free delivery on all orders. No minimum order value.
Cash on Delivery
COD available on orders up to ₹5,000 across India.
Ideal For
About This Product
The DIY Sine Triangle Square Wave NE555 Multi-Channel Waveform Generator Module Kit is a value-for-money designed for DIY enthusiasts and makers. Customers highlight its excellent build quality and great value for money.
Why Buy from Elecvora?
Elecvora sources this product directly, cutting out multiple middlemen. Every order includes free shipping, a 15-day return policy, and secure payment via Razorpay.
Description:
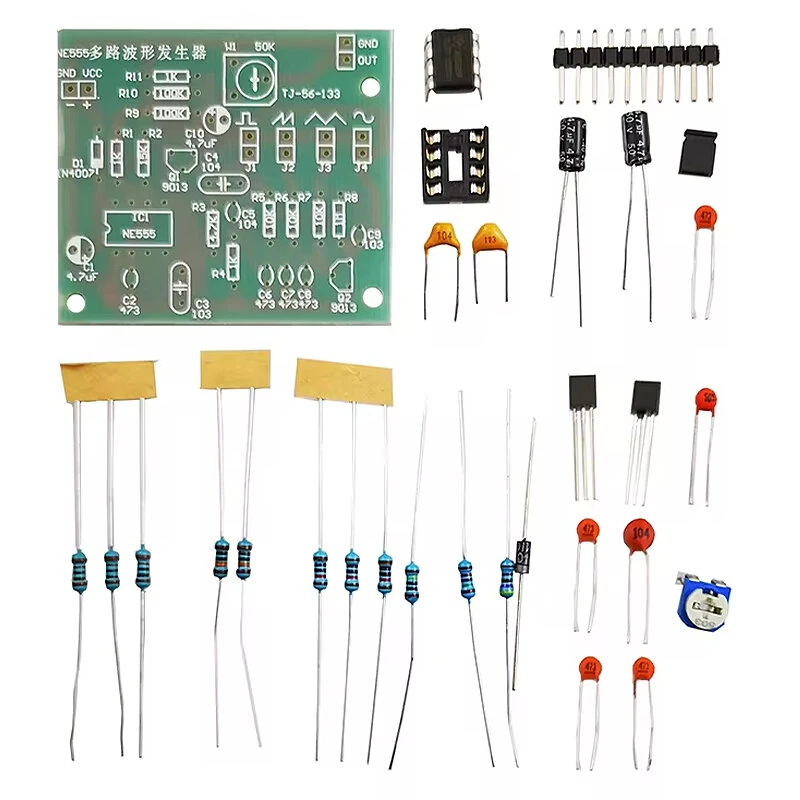
In the circuit, D1 is the anti-power diode, and C1 is the filter capacitor. IC1, R1, R2 and C2 form a square wave generator. The signal is output from the three pins of IC1, and C3 is the anti-interference capacitance.
The square wave output from the third pin of IC1 is coupled through R3, R4 partial voltage and C5, and the square wave can be output at the output end by shorting J1 with a short circuit block. The other circuit passes through C4 coupling and C3 partial pressure
The sawtooth waveform formed by the integration circuit R5 and C7 is output by J2, and then the triangle wave formed by the integration circuit R6 and C8 is output from J3. After R7, C9, R8, Q2
After the amplification circuit composed of R9 is amplified, the Q2 collector becomes a sine wave.
R10, R11 and Q1 form an emitter following amplifier circuit, and the final signal is output from the output terminal through C10 coupling W1 partial voltage.
Specifications:
Product name: NE555 multi-channel waveform generator DIY welding kit
Product model: TJ-56-133
Working voltage: DC5~12V
PCB size: 52 * 45mm
Package Include:
3x 1K ohm Color Ring Resistor
1x 1M ohm Color Ring Resistor
1x 4.7K ohm Color Ring Resistor
3x 10K ohm Color Ring Resistor
1x 15K ohm Color Ring Resistor
2x 100K ohm Color Ring Resistor
1x 0.01uF Monolithic Capacitor
1x 0.01uF Ceramic Capacitor
1x 0.1uF Monolithic Capacitor
1x 0.1uF Ceramic Capacitor
4x 0.047uF Ceramic Capacitor
2x 4.7uF Electrolytic Capacitor
1x 1N4007 Diode
1x 50K ohm Adjustable Resistor
2x 9013 Triode
1x NE555 IC
5x 2P Pin


